Particles
粒子
This tutorial is going to talk about the particle
system in BabylonJS. Particles are often small
sprites used to simulate hard-to-reproduce phenomena like fire, smoke, water,
or abstract visual effects like magic glitter and faery dust. This is done by
emitting a cloud of very many particles from a region. From version 3.2 there
are specific emitters to constrain this region in the shape of a box, sphere or
cone. You can also write your own custom functions to control the cloud and
region.
这篇教程将讨论Babylon.js中的粒子系统。粒子通常是小的精灵对象,用来模拟难以呈现的现象,比如火焰、烟雾、水或者幻想中的视觉效果,比如魔法闪光和仙界尘埃。这都是通过从一个区域发出由大量精灵组成的粒子云实现的。从3.2版本开始,有专门的方法用来把这个区域的形状约束为盒子、球体或者椎体。你也可以编写你自己的方法来控制这个云和范围
GPU particles are the latest addition to the
particles family and can be used, with an appropriate browser, to boost
performance.
GPU粒子是最新添加到粒子家族里的,并且已经可以使用,可以用一个合适的浏览器来提升效果。
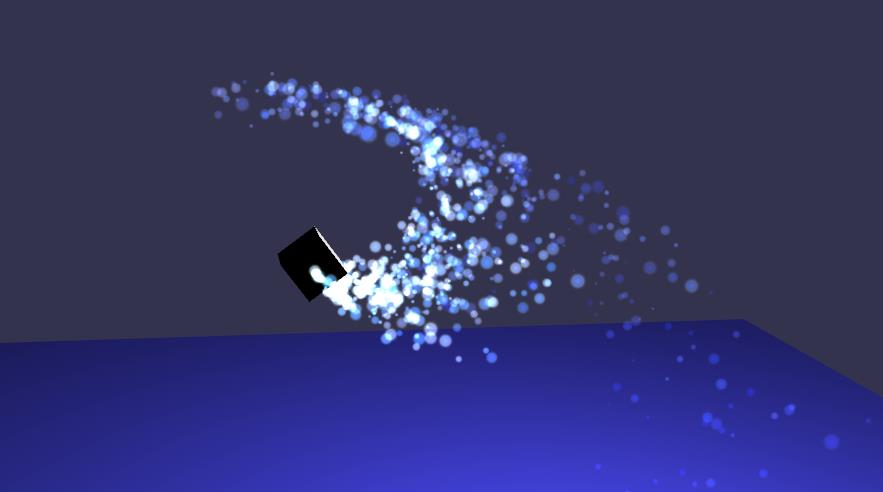
Particles. 粒子
粒子系统的例子
var createScene
= function () {
var scene = new BABYLON.Scene(engine);
// Setup environment
var light0 = new BABYLON.PointLight("Omni", new
BABYLON.Vector3(0, 2, 8), scene);
var camera = new BABYLON.ArcRotateCamera("ArcRotateCamera", 1, 0.8, 20, new BABYLON.Vector3(0, 0, 0), scene);
camera.attachControl(canvas,
true);
// Fountain object
var fountain = BABYLON.Mesh.CreateBox("foutain", 1.0, scene);
// Ground
var ground = BABYLON.Mesh.CreatePlane("ground", 50.0, scene);
ground.position
= new BABYLON.Vector3(0, -10, 0);
ground.rotation
= new BABYLON.Vector3(Math.PI
/ 2, 0, 0);
ground.material
= new BABYLON.StandardMaterial("groundMat", scene);
ground.material.backFaceCulling
= false;
ground.material.diffuseColor
= new BABYLON.Color3(0.3, 0.3, 1);
// Create
a particle system
var particleSystem = new BABYLON.ParticleSystem("particles", 2000, scene);
//Texture of each
particle
particleSystem.particleTexture
= new BABYLON.Texture("textures/flare.png", scene);
// Where the particles
come from
particleSystem.emitter
= fountain; // the starting object, the emitter
particleSystem.minEmitBox
= new BABYLON.Vector3(-1, 0, 0); // Starting
all from
particleSystem.maxEmitBox
= new BABYLON.Vector3(1, 0, 0); // To...
// Colors of all
particles
particleSystem.color1 = new BABYLON.Color4(0.7, 0.8, 1.0, 1.0);
particleSystem.color2 = new BABYLON.Color4(0.2, 0.5, 1.0, 1.0);
particleSystem.colorDead
= new BABYLON.Color4(0, 0, 0.2, 0.0);
// Size of each
particle (random between...
particleSystem.minSize
= 0.1;
particleSystem.maxSize
= 0.5;
// Life time of each
particle (random between...
particleSystem.minLifeTime
= 0.3;
particleSystem.maxLifeTime
= 1.5;
// Emission rate
particleSystem.emitRate
= 1500;
// Blend mode : BLENDMODE_ONEONE, or BLENDMODE_STANDARD
particleSystem.blendMode
= BABYLON.ParticleSystem.BLENDMODE_ONEONE;
// Set the gravity of
all particles
particleSystem.gravity
= new BABYLON.Vector3(0, -9.81, 0);
// Direction of each
particle after it has been emitted
particleSystem.direction1 = new BABYLON.Vector3(-7, 8, 3);
particleSystem.direction2 = new BABYLON.Vector3(7, 8, -3);
// Angular speed, in
radians
particleSystem.minAngularSpeed
= 0;
particleSystem.maxAngularSpeed
= Math.PI;
// Speed
particleSystem.minEmitPower
= 1;
particleSystem.maxEmitPower
= 3;
particleSystem.updateSpeed
= 0.005;
// Start the particle
system
particleSystem.start();
// Fountain's
animation
var keys = [];
var animation = new BABYLON.Animation("animation", "rotation.x", 30, BABYLON.Animation.ANIMATIONTYPE_FLOAT,
BABYLON.Animation.ANIMATIONLOOPMODE_CYCLE);
// At the animation
key 0, the value of scaling is "1"
keys.push({
frame: 0,
value: 0
});
// At the animation
key 50, the value of scaling is "0.2"
keys.push({
frame: 50,
value: Math.PI
});
// At the animation
key 100, the value of scaling is "1"
keys.push({
frame: 100,
value: 0
});
// Launch animation
animation.setKeys(keys);
fountain.animations.push(animation);
scene.beginAnimation(fountain, 0, 100, true);
return scene;
}
(不要长时间盯着粒子看,会头晕)
(本篇教程很长,个人认为从“和谐粒子”开始的内容都可以放在扩展阅读中供读者选读,另外教程中有很多段重复的段落,作者或许可以用更好的方式处理。)
Creating the Particles
建立粒子
Particle System
粒子系统
To perform this magic trick you first need to create
a ParticleSystem object.
要表演这个魔法戏法,你首先需要建立一个粒子系统对象。
var particleSystem = new BABYLON.ParticleSystem("particles", 2000, scene);
This sets the number of particles in the system (capacity). The particle
system also requires a texture so that the particles can be seen and an emitter
which sets the location and spread of the particles from a starting point.
这里设置了系统中的粒子数(容量)。这个粒子系统还需要一个纹理才能让例子可见,还需要一个发射器,来设置例子的起始位置、方位和散布方式。
Please note that you can use the ParticleHelper
to create a default configured system with:
请注意你可以使用ParticleHelper对象来 建立一个默认配置的系统
BABYLON.ParticleHelper.CreateDefault(emitter).
Once completed you set the particle system in motion using
一旦建立完成,你可以使用如下方法启动粒子系统
particleSystem.start();
and stop it with
并使用这个方法停止它:
particleSystem.stop();
To delay a particle systems start, particleSystem.startDelay = 3000; can be set. This value defines the delay in
milliseconds.
要推迟一个粒子系统的启动,可以设置particleSystem.startDelay = 3000。这个值以毫秒的形式定义启动延迟。
You can also delay start the particle system with particleSystem.start(3000);. This value with override the particleSystem.startDelay
field if set.
你还可以使用particleSystem.start(3000)的方式来延迟粒子系统的启动;这个值将覆盖particleSystem.startDelay属性。
Note: that stopping a particle
system will prevent the creation of new particles but the existing ones will continue.
If you want to reset a system to an empty state, you will also have to call particleSystem.reset()
注意:停止粒子系统将阻止新粒子的产生,但已经存在的粒子仍将继续运动。如果你希望将一个系统复位到空白状态,你还必须调用particleSystem.reset()
You can also set the amount of time the particle system is running though
live particles may continue after that time.
你还可以设置粒子系统持续的时间长度,在这个时间结束之后新粒子不再产生,但仍存活的粒子仍将继续运动
particleSystem.targetStopDuration = 5;
Once stopped you can dispose of the particle
system. Very useful if you want to create a one shot particle system with a
specific targetStopDuration.
停止之后,你就可以释放这个例子系统。以下方法在你建立一个具有指定持续时间的一次性粒子系统时是很有用的。(停止后自动释放粒子系统,不需要回调函数释放)
particleSystem.disposeOnStop = true;
(这里设置的是粒子系统的发射停止时间,后面还会设置单个粒子的生存时间)
Pre-warming
预热
Starting with Babylon.js v3.3, you can now specify a pre-warming period to
make sure your system is in a correct state before rendering.
从Babylon.js3.3版开始,你可以设定一个预热环节,来确保你的系统在渲染前处于正确的状态。
To do so, you need to setup two properties:
要做到这一点,你需要启动两个属性:
system.preWarmCycles: Gets or
sets a value indicating how many cycles (or frames) must be executed
before first rendering (this value has to be set before starting the
system). Default is 0 (ie. no pre-warming)
系统预热循环:获取或设置一个值,表示在第一次渲染前需要执行多少个循环(或者帧)(这个值必须在启动系统之前设定)。默认值为0(意味着没有预热)
system.preWarmStepOffset: Gets or
sets a value indicating the time step multiplier to use in pre-warm mode
(default is 1)
系统预热步调偏移:获取或设置一个值,表示预热模式使用的时间步调乘数(默认为1)
So if you set your system like this:
如果你这样设置你的粒子系统:
system.preWarmCycles = 100;
system.preWarmStepOffset = 5;
system.start();
It will execute the particle animation loop 100 times with a time step set
to 5 times faster than realtime. The more cycles you
want, the slower the system will be to start. So it could be interesting to
increase the time step to have less cycles to run. But
keep in mind that a too big time step will introduce issues if the life spam of a particle is smaller than the time step.
它将在100次速度5倍于真实时间的循环之后启动粒子动画。你需要的循环越多,系统启动的也就越慢。所以加快时间的步伐,执行更少的帧数可能是吸引人的。但是请记住如果时间步调过大,在粒子的生存时间小于时间步调时会产生一些问题。
Here is an example of pre-warming: https://www.babylonjs-playground.com/#MX2Z99#8
-
这里是一个预热的例子:
Particle Texture
粒子纹理
To apply a texture to the particles, such as
要为粒子设置一个纹理,比如这个:

set the particleTexture
设置粒子纹理
particleSystem.particleTexture = new BABYLON.Texture("PATH TO IMAGE", scene);//红字:图片的路径
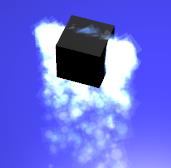
You can also apply a mask to a texture to filter some colors, or filter a
part of the alpha channel.
你还可以为纹理添加一个遮罩,来过滤掉一些颜色,或者过滤掉一部分透明度通道
particleSystem.textureMask = new BABYLON.Color4(0.1, 0.8, 0.8, 1.0);
This example produces the following
这个例子运行效果如下:
To use multiple textures in the scene use multiple particle systems all of
which can use the same emitter object.
如果想在场景中使用多种具有不同纹理的粒子,只需建立多个粒子系统,它们都可以使用相同的发射器对象。
Particle Emitter
粒子发射器
The emitter can be located either with a vector3 or a mesh, in which case
the position of the mesh is used as the location.
粒子发射器可以使用一个点坐标或者一个网格定位,在使用网格定位的情况下,网格的位置属性被作为发射器的位置
particleSystem.emitter = new BABYLON.Vector3(-1, 2, 3);
var source = BABYLON.Mesh.CreateBox("source", 1.0, scene);
particleSystem.emitter = source;
World offset
世界偏移
Starting with Babylon.js v4.0, you can set up a world offset to your particles
with:
从Babylon.js4.0版开始,你可以这样为你的粒子设置世界偏移:
particleSystem.worldOffset = new BABYLON.Vector3(100, 20, -453);
This command will shift the particles using the offset (Mostly used when
you need to keep the camera at the center of the world to increase precision and
then move the world instead).
这条命令将按照这个偏移量移动粒子(多用在你为了提高精确性需要让相机位于世界的中心,然后移动世界时)
Location and Spread
位置和扩散
The spread of the particles from the emitter is from within a box the size
of which is determined by setting the lower, left, front corner and upper, right,
back corner of the box relative to the location of the emitter. This is done
using minEmitBox and maxEmitBox
粒子从发射器出发时的分布效果通过一个盒子设置,这个盒子的尺寸通过相对于这个发射器的底面距离,左面距离,前面距离,顶面距离,右面距离,后面距离确定。这些距离是通过最小发射盒与最大发射盒参数定义的(意思就是粒子从发射器周围的一个盒状区域内的随机位置产生)
particleSystem.minEmitBox = new BABYLON.Vector3(-2, -3, 4);
particleSystem.maxEmitBox = new BABYLON.Vector3(4, 2, 3);
(其实是盒子的左下内角和右上外角?)
The box can be collapsed to a line in the direction of an axis, for example
the X-axis
这个盒子可以退化为一条沿着坐标轴的线,比如沿着X轴
particleSystem.minEmitBox = new BABYLON.Vector3(-1, 0, 0);
particleSystem.maxEmitBox = new BABYLON.Vector3(1, 0, 0);
Basic Playground Example
基础Playground例子
At his point you can now create a particle system though it is very uninspiring.
Just a few particles appearing in the spread space, drifting around
and disappearing.
虽然还很不闪亮,但你现在已经可以建立一个粒子系统。只是一些出现在分布区域内的粒子,四处飘散并消失。
Fortunately things can be made more interesting very soon with the setting
of more properties. Read on.
幸运的是通过设置更多的属性,能让事情更加有趣,请继续阅读。
Fine Tune Particle System
和谐的粒子系统
See how to change the lifetime, size, and color of the particles, their rates
of emission, direction of travel (optionally affected by gravity). You can also
affect their rotation, speed and cloud shape. Below you can find playground examples where
you can alter some of these parameters.
查看如何修改粒子的生存时间、尺寸、颜色,以及它们的发射频率、移动方向(可以选则是否受重力影响)。你还可以影响它们的姿态、速度以及粒子云的形状。在下面你可以找到Playground例子,在那些例子里你可以调整其中的一些参数。
Lifetime
生存时间
The time taken for particles to disappear (or die) after being emitted can
be varied. Once a particle dies a the particle is recycled foe emission. Their lifetime is
given as a random range between a low and high value as in
例子从被发射到消失(或者说死亡)所花的时间是可以设置的。一旦一个粒子死亡,这个粒子对应的精灵对象将被循环利用,准备下次发射。它们的生存时间是通过在一个最小值和一个最大值之间随机取数确定的:
particleSystem.minLifeTime = 0.3;
particleSystem.maxLifeTime = 1.5;
Starting with Babylon.js v3.3, you can also define the lifetime respectively
to the particle system duration. For instance, if your call system.targetStopDuration = 0.5 then you can define particle life time with a
gradient like this:
从Babylon.js3.3开始,你可以设置与粒子系统持续时间相关联的粒子生存时间。例如:如果你把系统的持续时间设为0.5秒,那么你就可以像这样用一个梯度来定义粒子生存时间。
particleSystem.addLifeTimeGradient(0, 0.5);
particleSystem.addLifeTimeGradient(1, 0);
The first parameter defines the gradient (0 means at the particle system
start and 1 means at particle system end). The second parameter is the particle
life time. This means that at the beginning of the particle system, particles will
receive a life time set to 0.5. And when the system will be close to the targetStopDuration the particles
will receive a life time close to 0.
第一个参数定义梯度(0表示粒子系统开始,1表示粒子系统停止)。第二个参数表示粒子的生存时间。这意味着在粒子系统启动时,粒子的生存时间将被设为0.5秒,而在系统接近关闭时刻时,粒子将收到一个接近0的生存时间(推测0,1之间应该会进行线性插值)(又是一个不使用回调函数的设计)
It is recommended to at least define a gradient for 0 and 1.
要求最少为0和1设置一个梯度。
You can add as much gradients as you want as long as
the gradient value is between 0 and 1.
只要梯度值在0到1之间,你可以设置任意多的梯度。
You can also define a more complex construct by providing two values per
gradient:
你还可以通过为每个梯度提供两个参数值,来定义一个更复杂的构造:
particleSystem.addLifeTimeGradient(0, 0.5, 0.8);
particleSystem.addLifeTimeGradient(1.0, 0, 0.1);
In this case the life time of the particle will be randomly picked between
the two values when the gradient will be reached.
在这种情况下,粒子的生存时间,在达到相应的梯度时,将随机的在这两个数之间取值。
To remove a gradient you can call particleSystem.removeLifeTimeGradient(0.5).
要移除一个梯度,你可以调用particleSystem.removeLifeTimeGradient(0.5).(移除正中间的梯度)
Size
尺寸
The size of the particles can also be varied randomly within a given range.
粒子的尺寸同样可以在一个给定的范围内随机确定。
particleSystem.minSize = 0.1;
particleSystem.maxSize = 0.5;
If you want to change the particle size to not be a square you can then use
the min/max for ScaleX/Y:
如果你想改变粒子的尺寸,让它不再是正方形,你可以使用X或Y轴方向的最小或最大缩放:
particleSystem.minScaleX = 0.1;
particleSystem.maxScaleX = 0.5;
particleSystem.minScaleY = 0.2;
particleSystem.maxScaleY = 0.4;
Starting with Babylon.js v3.3, you can also define size factor gradients.
从Babylon.js3.3版开始,你还可以定义尺寸乘数梯度。
To add a size gradient just call the following
code:
要添加一个尺寸梯度,只需调用以下代码:
particleSystem.addSizeGradient(0, 0.5);
The first parameter defines the gradient (0 means at the particle birth and
1 means at particle death). The second parameter is the factor to apply to particle
initial size. In this case the particle will born with
half of the initial size (which is computed from minScale
and maxScale). It is recommended to at least define a
gradient for 0 and 1:
第一个参数定义梯度(0表示粒子的出生,1表示粒子的死亡)。第二个参数是施加在粒子的初始尺寸上的乘数。在这种情况下,粒子将以一半的初始尺寸出生(初始尺寸是通过最小缩放和最大缩放随机取的,也就是说尺寸缩放和缩放梯度是相互叠加的)。要求最少为0和1定义一个梯度:
particleSystem.addSizeGradient(0, 0.5);
particleSystem.addSizeGradient(1.0, 3);
You can add as much gradients as you want as long as
the gradient value is between 0 and 1.
只要梯度值在0到1之间,你可以添加任意多个梯度。
You can also define a more complex construct by providing two values per
gradient:
你还可以通过为每个梯度提供两个参数值,来定义一个更复杂的构造:
particleSystem.addSizeGradient(0, 0.5, 0.8);
particleSystem.addSizeGradient(1.0, 3, 4);
In this case the size of the particle will be randomly picked between the
two values when the gradient will be reached.
在这种情况下,粒子的生存时间,在达到相应的梯度时,将随机的在这两个值之间取值。
To remove a gradient you can call particleSystem.removeSizeGradient(0.5).
要移除一个梯度,你可以调用particleSystem.removeSizeGradient(0.5).
When dealing with particle size, you may need to move the pivot (aka the
center of the transform). By default the scale will come from the center of the
particle but you may want to scale it from the top or the bottom. To change the
pivot position, just call:
在处理粒子的尺寸时,你可能需要移动粒子的旋转轴(aka变换的中心)。默认情况下缩放将从粒子的中心发生,但是你可能希望从顶部或者底部缩放这个粒子。要改变转轴的位置,只需调用:
particleSystem.translationPivot = new BABYLON.Vector2(0, -0.5);
Here is an example with size gradients and a pivot set to bottom: https://www.babylonjs-playground.com/#L9QWZB#0
-
这是一个转轴设为底部,同时使用尺寸梯度的例子:
Particle Colors
粒子颜色
There are three colors that can be set for the particle system, two which
are combined (or blended) during the lifetime of the particle and a third that
it takes on just before it disappears.
粒子系统可以设置三种颜色属性,其中的两种将在粒子的生存时间里进行混合,而第三种则将在粒子即将消失时使用
particleSystem.color1 = new BABYLON.Color4(0.7, 0.8, 1.0, 1.0);//透明度为1表示完全不透明
particleSystem.color2 = new BABYLON.Color4(0.2, 0.5, 1.0, 1.0);
particleSystem.colorDead = new BABYLON.Color4(0, 0, 0.2, 0.0);
Starting with Babylon.js v3.3, you can also define color gradients. If you
define color gradients the color1, color2 and colorDead
properties will be ignore.
从Babylon.js3.3版开始,你还可以定义颜色梯度。如果你定义了颜色梯度,则颜色1、颜色2和消失颜色属性将被忽略。
To add a color gradient just call the following code:
要添加一个颜色梯度只需调用以下代码:
particleSystem.addColorGradient(0, new BABYLON.Color4(1, 1, 1, 0));
The first parameter defines the gradient (0 means at the particle birth and
1 means at particle death). It is recommended to at least define a gradient for
0 and 1:
第一个参数定义梯度(0表示粒子的出生,1表示粒子的死亡)。要求最少为0和1定义一个梯度:
particleSystem.addColorGradient(0, new BABYLON.Color4(1, 1, 1, 0));
particleSystem.addColorGradient(1.0, new BABYLON.Color4(1, 1, 1, 1));
You can add as much gradients as you want as long as
the gradient value is between 0 and 1.
只要梯度值在0到1之间,你可以添加任意多个梯度。
You can also define a more complex construct by providing two colors per
gradient:
你还可以通过为每个梯度提供两个参数值,来定义一个更复杂的构造:
particleSystem.addColorGradient(0, new BABYLON.Color4(1, 1, 1, 0), new BABYLON.Color4(1, 0, 1, 0));
particleSystem.addColorGradient(1.0, new BABYLON.Color4(1, 1, 1, 1)new BABYLON.Color4(1, 0, 1, 1));
In this case the color of the particle will be randomly picked between the
two colors when the gradient will be reached.
在这种情况下,粒子的生存时间,在达到相应的梯度时,将随机的在这两个颜色值之间取值。
To remove a gradient you can call particleSystem.removeColorGradient(0.5).
要移除一个梯度,你可以调用particleSystem.removeColorGradient(0.5).
Here is an example of color gradients: https://www.babylonjs-playground.com/#MX2Z99#8
-
这里是一个颜色梯度的例子(会代替粒子纹理?)
Particle blending
粒子混合
There are different ways that particles are blended with the scene and these
are set with blendMode.
粒子和场景之间有多种混合方式,这些方式通过blendMode属性设置。
particleSystem.blendMode = BABYLON.ParticleSystem.BLENDMODE_ONEONE;
particleSystem.blendMode = BABYLON.ParticleSystem.BLENDMODE_STANDARD;
BLENDMODE_ONEONE is the
default and will be used if blendMode is not
specified.
BLENDMODE_ONEONE是默认的属性,将在“混合模式”未设置时被使用。
BLENDMODE_ONEONE - colors are added
without alpha affecting the result;
直接叠加颜色,并且透明度没有影响
BLENDMODE_STANDARD - colors are added
using particle’s alpha (ie. color (1 - alpha) + particleColor alpha).
使用粒子的透明度叠加颜色(粒子背后物体的颜色*(1-粒子的透明度)+粒子的颜色*粒子的透明度)(如果粒子完全不透明,则计算结果为粒子颜色)
BLENDMODE_ADD - colors are added but only particle
color uses particle’s alpha (ie. color + particleColor * alpha).
叠加颜色,但只有粒子的颜色使用透明度(粒子背后物体的颜色+粒子的颜色*粒子的透明度)
BLENDMODE_MULTIPLY - colors are
multiplied and added to (1 - alpha) (ie. color *
particleColor + 1 - alpha). Demo here -
颜色被相乘然后和(1 - alpha)相加(粒子背后物体的颜色*粒子的颜色+1-粒子的透明度)。示例在这里-
BLENDMODE_MULTIPLYADD - two passes
rendering with BLENDMODE_MULTIPLY and then
BLENDMODE_ADD. Demo here -
两步渲染,先是BLENDMODE_MULTIPLY接着是BLENDMODE_ADD。示例在这里-
Rates
频率
The emitRate determines the
number of particles emitted per second. The larger the number the more dense
appears the emitted cloud of particles. As particles die they are recycled to
be emitted again. If their lifetime is long enough and their emission rate fast
enough it is possible for there to be a gap in the emission of particles.
“发射率”决定了每秒发射的粒子数量。这个值越大发射的粒子云表现的越密集。当粒子死亡时,它们将被循环利用重新发射。如果它们的生存时间足够长,并且发射率足够高,粒子的发射可能会发生中断。
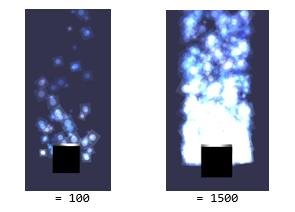
particleSystem.emitRate = 1000;
You can stop the continuous emission of particles by setting a manual emit
count.
你可以通过设定一个发射计数器来停止粒子发射
particleSystem.manualEmitCount = 300;
In this case the number of particles given by the
count are emitted and there are no further emissions of particles.
在这种情况下,计数器给出的数量的粒子将被发射,而之后不会再有粒子发射
Direction
方向
Two directions can be specified. If you specify just one direction the particles
will travel randomly in the general direction given. When both directions are
given the particles will generally travel inside the two directions.
可以设定两个方向属性。当只设定一个方向属性时,粒子将大概的随机的沿着给出的方向移动。当设置两个方向属性时,粒子将大概的在两个方向之间移动
particleSystem.direction1 = new BABYLON.Vector3(-7, 8, 3);
particleSystem.direction2 = new BABYLON.Vector3(7, 8, -3);
Direction can also be affected by gravity.
方向同样会被重力影响
Gravity
重力
A value for gravity can be applied. For example if negative in the Y direction
the particles will slowly be pulled downwards.
可以应用一个重力值。比如设置为Y轴负方向,则粒子将缓缓下落。
particleSystem.gravity = new BABYLON.Vector3(0, -9.81, 0);
Rotation
姿态
You can define a range of angular speeds for the particles about the Z-axis
for the particles in radians per second:
你可以用每秒多少弧度的方式为粒子定义一个绕Z轴旋转的角速度范围(精灵总是朝向相机)
particleSystem.minAngularSpeed = 0;
particleSystem.maxAngularSpeed = Math.PI;
You can also define the initial rotation angle with:
你也可以这样定义初始的旋转角度
particleSystem.minInitialRotation = 0;
particleSystem.maxInitialRotation = Math.PI;
Starting with Babylon.js v3.3, you can also define angular speed factor gradients.
从Babylon.js3.3版开始,你还可以定义角速度梯度。
To add a angular
speed gradient just call the following code:
要添加一个角速度梯度,只需调用以下代码
particleSystem.addAngularSpeedGradient(0, 0.5);
The first parameter defines the gradient (0 means at the particle birth and
1 means at particle death). The second parameter is the angular speed to use.
In this case the particle will born with an angular
speed set to 0.5 radians per frame. It is recommended to at least define a
gradient for 0 and 1:
第一个参数定义梯度(0表示粒子的出生,1表示粒子的消亡)。第二个参数是使用的角速度。在这个情况下,粒子将带着每秒0.5弧度的角速度出生。要求最少为0和1定义一个梯度:
particleSystem.addAngularSpeedGradient(0, 0.5);
particleSystem.addAngularSpeedGradient(1.0, 3);
You can add as much gradients as you want as long as
the gradient value is between 0 and 1.
只要梯度值在0到1之间,可以添加任意多个梯度。
You can also define a more complex construct by providing two values per
gradient:
你还可以通过为每个梯度提供两个参数来定义一个更复杂的构造:
particleSystem.addAngularSpeedGradient(0, 0.5, 0.8);
particleSystem.addAngularSpeedGradient(1.0, 3, 4);
In this case the angular speed of the particle will randomly be picked between
the two values when the gradient will be reached.
在这种情况下,粒子的角速度将在达到相应梯度时,随机的在两个值之间选取。
To remove a gradient you can call particleSystem.removeAngularSpeedGradient(0.5).
要移除一个梯度,你可以调用particleSystem.removeAngularSpeedGradient(0.5).
Speed
速度
You can define a range for the power of the emitting particles, and the overall
motion speed (0.01 is default update speed, faster updates = faster animation).
你可以定义粒子发射的力量范围,以及总体运动速度(速度默认为0.01,越快的更新等于越快的动画)。
particleSystem.minEmitPower = 1;
particleSystem.maxEmitPower = 3;
particleSystem.updateSpeed = 0.005;
Velocity over time
随时间变化的速率()
You can define velocity over time with gradients. The velocity over time
is the energy (or the factor) applied to direction of the particle. A value of 2
will multiply the direction size by two hence multiplying the particle speed by
2.
你可以通过梯度定义随时间变化的速率。
To add a velocity gradient just call the following code:
要添加一个速率梯度,只需调用以下代码
particleSystem.addVelocityGradient(0, 0.5);
The first parameter defines the gradient (0 means at the particle birth and
1 means at particle death). The second parameter is the velocity to use. In this
case the particle will born with velocity set to 0.5.
It is recommended to at least define a gradient for 0 and 1:
第一个参数定义梯度(0表示粒子的出生,1表示粒子的消亡)。第二个参数是使用的速率。在这个情况下,粒子将带着0.5的速率出生。要求最少为0和1定义一个梯度:
particleSystem.addVelocityGradient(0, 0.5);
particleSystem.addVelocityGradient(1.0, 3);
You can add as much gradients as you want as long as
the gradient value is between 0 and 1.
只要梯度值在0到1之间,可以添加任意多个梯度。
You can also define a more complex construct by providing two values per
gradient:
你还可以通过为每个梯度提供两个参数来定义一个更复杂的构造:
particleSystem.addVelocityGradient(0, 0.5, 0.8);
particleSystem.addVelocityGradient(1.0, 3, 4);
In this case the velocity of the particle will randomly be picked between
the two values when the gradient will be reached.
在这种情况下,粒子的速率将在达到相应梯度时,随机的在两个值之间选取。
Here is an example of velocity applied to a particle system: https://www.babylonjs-playground.com/#3W04PW#0
-
这里是一个在粒子系统中应用速率的例子:
To remove a gradient you can call particleSystem.removeVelocityGradient(0.5).
要移除一个梯度,你可以调用particleSystem.removeVelocityGradient(0.5).
Limit velocity over time
随着时间限制速率()
You can define a limit for velocity over time with gradients. This limit
will be used to check the current speed of the particle and if the limit is reached
then a factor will be applied to the speed. You can define this factor with particleSystem.limitVelocityDamping.
你可以使用梯度定义一个随着时间变化的速率限制。这个限制将用来检查粒子的当前速度,如果达到了这个限制则一个乘数将被施加到速度上。你可以使用“粒子系统的速率限制阻尼”来定义这个乘数
To add a limit velocity gradient just call the following code:
要添加一个速率限制梯度,只需调用以下代码
particleSystem.addLimitVelocityGradient(0, 0.5);
The first parameter defines the gradient (0 means at the particle birth and
1 means at particle death). The second parameter is the limit velocity to use.
In this case, the particle speed will be check directly after birth and if it
is bigger than 0.5 then the damping parameter will be applied (so velocity will
be code velocity * damping).
第一个参数定义梯度(0表示粒子的出生,1表示粒子的消亡)。第二个参数是使用的速率限制。在这个情况下,在出生后粒子的速度将被直接检查,如果超过0.5则将启用阻尼参数。(速度将变成代码定义的速度乘以阻尼)
It is recommended to at least define a gradient for 0 and 1:
要求最少为0和1定义一个梯度:
particleSystem.addLimitVelocityGradient(0, 0.5);
particleSystem.addLimitVelocityGradient(1.0, 3);
You can add as much gradients as you want as long as
the gradient value is between 0 and 1.
只要梯度值在0到1之间,可以添加任意多个梯度。
You can also define a more complex construct by providing two values per
gradient:
你还可以通过为每个梯度提供两个参数来定义一个更复杂的构造:
particleSystem.addLimitVelocityGradient(0, 0.5, 0.8);
particleSystem.addLimitVelocityGradient(1.0, 3, 4);
In this case the limit velocity of the particle will randomly be picked between
the two values when the gradient will be reached.
在这种情况下,粒子的速度限制将在达到相应梯度时,随机的在两个值之间选取。
Here is an example of limit velocity applied to a particle system: https://www.babylonjs-playground.com/#9GBBPM#2
-
这里是一个在粒子系统中应用速度限制的例子
To remove a gradient you can call particleSystem.removeLimitVelocityGradient(0.5).
要移除一个梯度,你可以调用particleSystem.removeLimitVelocityGradient(0.5).
Drag factor
拖拽乘数
You can define a drag factor over time with gradients. This factor will be
used to simulate air friction by applying a drag factor to the particle
direction. For instance, if your drag factor is set to 0.8 then only 20% of the
particle direction will be added to particle position.
你可以使用梯度定义一个拖拽乘数。这个属性可以通过给粒子的运动方向施加拖拽乘数,来模拟空气阻力。比如,如果你的拖拽乘数设为0.8,则只有百分之二十的粒子方向(可以理解为每两帧之间粒子的位移)会被添加到粒子位置上。
To add a drag gradient just call the following code:
要添加一个拖拽乘数梯度,只需调用以下代码
particleSystem.addDragGradient(0, 0.5);
The first parameter defines the gradient (0 means at the particle birth and
1 means at particle death). The second parameter is the drag factor to use. In
this case, the particle position will be particle.position = particle.direction * (1.0 - 0.5).
第一个参数定义梯度(0表示粒子的出生,1表示粒子的消亡)。第二个参数是使用的拖拽乘数。在这个情况下,粒子的位置将是:粒子位置=粒子方向*(1.0-0.5)。
It is recommended to at least define a gradient for 0 and 1:
要求最少为0和1定义一个梯度:
particleSystem.addDragGradient(0, 0.5);
particleSystem.addDragGradient(1.0, 3);
You can add as much gradients as you want as long as
the gradient value is between 0 and 1.
只要梯度值在0到1之间,可以添加任意多个梯度。
You can also define a more complex construct by providing two values per
gradient:
你还可以通过为每个梯度提供两个参数来定义一个更复杂的构造:
particleSystem.addDragGradient(0, 0.5, 0.8);
particleSystem.addDragGradient(1.0, 0, 0.1);
In this case the drag factor of the particle will randomly be picked between
the two values when the gradient will be reached.
在这种情况下,粒子的拖拽乘数将在达到相应梯度时,随机的在两个值之间选取。
Here is an example of drag factor applied to a particle system: https://www.babylonjs-playground.com/#BDW3BF#0
-
这里是一个在粒子系统里使用拖拽乘数的例子:
To remove a gradient you can call particleSystem.removeDragGradient(0.5).
要移除一个梯度,你可以调用particleSystem.removeDragGradient(0.5).
Emit rate over time
随时间变化的发射频率
You can define particle emit rate with gradients. The emit rate over time
will overwrite the value of system.emitRate property.
你可以使用梯度定义粒子的发射频率。随时间变化的发射频率将覆盖system.emitRate属性。
To add an emit rate gradient just call the following code:
要添加一个发射频率梯度,只需调用以下代码
particleSystem.addEmitRateGradient(0, 10);
Please note that emit rate gradient will only work
if the system has a determined life time meaning that you must define the system.targetStopDuration property
请注意发射频率梯度只在系统具有确定的运行时间时才能工作,这意味着你必须定义system.targetStopDuration属性(如果没有确定的运行时间,也就无从计算梯度1的确切时间了)
The first parameter defines the gradient (0 means at system start and 1 means
at system end). The second parameter is the emit rate to use. In this case the
system will start by emitting 10 particles per frame. It is recommended to at
least define a gradient for 0 and 1:
第一个参数定义梯度(0表示粒子的出生,1表示粒子的消亡)。第二个参数是使用的发射频率。在这个情况下,粒子系统以每帧发射10个粒子的状态启动。要求最少为0和1定义一个梯度。
particleSystem.addEmitRateGradient(0, 10);
particleSystem.addEmitRateGradient(1.0, 500);
You can add as much gradients as you want as long as
the gradient value is between 0 and 1.
只要梯度值在0到1之间,可以添加任意多个梯度。
You can also define a more complex construct by providing two values per
gradient:
你还可以通过为每个梯度提供两个参数来定义一个更复杂的构造:
particleSystem.addEmitRateGradient(0, 5, 10);
particleSystem.addEmitRateGradient(1.0, 800, 1000);
In this case the emit rate will randomly be picked between the two values
when the gradient will be reached.
在这种情况下,粒子的发射频率将在达到相应梯度时,随机的在两个值之间选取。
Here is an example of emit rate gradients applied to a particle system: https://www.babylonjs-playground.com/#3NM14X#0
-
这是一个在粒子系统中应用发射频率的例子:
To remove a gradient you can call particleSystem.removeEmitRateGradient(0.5).
要移除一个梯度,你可以调用particleSystem.removeEmitRateGradient(0.5).
Start size over time
随时间变化的起始尺寸
To add an start size gradient just call the
following code:
要添加一个起始尺寸梯度,只需调用以下代码
particleSystem.addStartSizeGradient(0, 2);
Please note that start size gradient will only work
if the system has a determined life time meaning that you must define the system.targetStopDuration property
请注意起始尺寸梯度只在系统具有确定的运行时间时才能工作,这意味着你必须定义system.targetStopDuration属性
The first parameter defines the gradient (0 means at system start and 1 means
at system end). The second parameter is the start size scale to use. In this
case the system will start by emitting particles of size 2 times the original
size. (eg. if size is set to
2 and start size is set to 3 the resulting output size will be 6) It is
recommended to at least define a gradient for 0 and 1:
第一个参数定义梯度(0表示粒子的出生,1表示粒子的消亡)。第二个参数是使用的起始尺寸。在这个情况下,粒子系统启动时将以两倍于原始尺寸的大小发射粒子。(例如,如果粒子的尺寸设为2,起始尺寸设为3,则输出的尺寸为6)要求最少为0和1定义一个梯度:(起始尺寸和缩放效果是叠加生效的?)
particleSystem.addStartSizeGradient(0, 10);
particleSystem.addStartSizeGradient(1.0, 500);
You can add as much gradients as you want as long as
the gradient value is between 0 and 1.
只要梯度值在0到1之间,可以添加任意多个梯度。
You can also define a more complex construct by providing two values per
gradient:
你还可以通过为每个梯度提供两个参数来定义一个更复杂的构造:
particleSystem.addStartSizeGradient(0, 5, 10);
particleSystem.addStartSizeGradient(1.0, 800, 1000);
In this case the start size will randomly be picked between the two values
when the gradient will be reached.
在这种情况下,粒子的起始尺寸将在达到相应梯度时,随机的在两个值之间选取。
Here is an example of start size gradients applied to a particle system:
https://www.babylonjs-playground.com/#3NM14X#14
-
这是一个在粒子系统中应用起始尺寸的例子:
To remove a gradient you can call particleSystem.removeStartSizeGradient(0.5).
要移除一个梯度,你可以调用particleSystem.removeStartSizeGradient(0.5).
Ramp gradients
阻尼梯度
You can use ramp gradients to change the color of the particle based on alpha.
你可以使用阻尼梯度改变以透明度为基础的粒子的颜色。
Ramp gradients are pretty powerful but require a bit of setup.
阻尼梯度是非常强大的,但需要一点启动设置。
First you need to declare your ramp gradients:
首先你需要声明你的阻尼梯度们:
system.addRampGradient(0.0, new BABYLON.Color3(1, 1, 1));
system.addRampGradient(0.09, new BABYLON.Color3(209/255, 204/255, 15/255));
system.addRampGradient(0.18, new BABYLON.Color3(221/255, 120/255, 14/255));
system.addRampGradient(0.28, new BABYLON.Color3(200/255, 43/255, 18/255));
system.addRampGradient(0.47, new BABYLON.Color3(115/255, 22/255, 15/255));
system.addRampGradient(0.88, new BABYLON.Color3(14/255, 14/255, 14/255));
system.addRampGradient(1.0, new BABYLON.Color3(14/255, 14/255, 14/255));
These gradients will be use to build a ramp
color texture.
这些梯度将被用来建立一个阻尼颜色纹理。
Then you need to turn them on:
接着你需要启动它们
system.useRampGradients = true;
By defaut the alpha value of the particle
(built from textureAlpha * particleColorAlpha) is used to
get the ramp color (Alpha is the index in the ramp gradients list) using this
formula: finalColor = textureColor * particleColor
* rampColor[alphaIndex].
默认情况下粒子的透明度值(由纹理透明度*粒子透明度产生)被用来获取阻尼颜色(透明度是阻尼梯度列表的索引,注意!这里的梯度值不再是粒子系统执行时间的比率,而是透明度!!),使用的公式是:最终颜色=纹理颜色*粒子颜色*阻尼颜色列表【透明度索引】(这里的趋势是越透明越亮,越不透明越暗)
But to give you more control you can use a remap function to change remap this alpha index:
但是为了提供更多的操控性,你可以使用一个重构的方法来重构透明度索引的修改方法:
system.addColorRemapGradient(0, 0, 0.1);
system.addColorRemapGradient(0.2, 0.1, 0.8);
system.addColorRemapGradient(0.3, 0.2, 0.85);
system.addColorRemapGradient(0.35, 0.4, 0.85);
system.addColorRemapGradient(0.4, 0.5, 0.9);
system.addColorRemapGradient(0.5, 0.95, 1.0);
system.addColorRemapGradient(1.0, 0.95, 1.0);
The color remap gradients define a min and max that will vary over time (depending
on hoe many gradients you add). The alpha index is
then remap from [min, max] to [0, 1] with this formula: finalAlphaIndex = clamp((alphaIndex
- min) / (max - min), 0.0, 1.0).
这里的颜色重构梯度,定义了一套随着时间变化的最小值和最大值(取决于你添加了多少个梯度,第一个参数为系统运行时间比率,第二个参数为最小透明度,第二个参数为最大透明度)。这时透明度索引被从[min, max]重构为[0, 1],使用以下公式:最终透明度=粒子系统从开始到结束的累加((透明度索引-最小透明度)/(最大透明度-最小透明度)))。
Ultimately you can also remap the alpha value generated per pixel with:
你也可以用以下方法整体的重构每个像素的透明度值:
system.addAlphaRemapGradient(0, 0, 0.1);
system.addAlphaRemapGradient(1.0, 0.1, 0.8);
The alpha remap will compute the final alpha value using this formula: finalAlpha = clamp((textureAlpha
* particleColorAlpha * rampColor.a
- min) / (max - min), 0.0, 1.0).
透明度重构将使用这个公式计算最终的透明度值:最终透明度=粒子系统从开始到结束的累加((纹理透明度*粒子颜色透明度*阻尼颜色透明度-最小透明度)/(最大透明度-最小透明度))
You can find a demo of the here: https://www.babylonjs-playground.com/#VS5XS7#0
-
你可以在这里找到一个示例(个人认为这里的内容值得专门用一篇教程说明,并且需要更多的示意图)
Alignment
排列
By default all particles are rendered as billboards. But you can decide to
instead align them with particle direction with system.isBillboardBased
= false.
默认情况下,所有的粒子都是像广告牌一样渲染的。但是你可以通过设置system.isBillboardBased = false,将它们改为沿着粒子方向排列。
You can find a demo here -
你可以在这里找到一个示例
When billboard is enabled you can decide to either have a full billboard
(on all axes) or only on Y axis with this code:
当广告牌模式被 启动时,你可以选择是使用一个完整的广告牌(在所有的轴上)或者只在Y轴上:
system.billboardMode = BABYLON.ParticleSystem.BILLBOARDMODE_Y;
You can also use stretched billboard which will be like a full billboard
mode but with an additionnal rotation to align
particles with their direction.
你还可以延展广告牌,这时广告牌将看起来像是完整的广告牌模式,但是具有一个额外的姿态属性用来沿着它们的方向排列粒子。
A demo can explain this billboard mode better than words: https://www.babylonjs-playground.com/#B9HKG0#0
-
相比语言,一个示例能更好的解释什么是广告牌模式
You can also find a demo of stretched billboard particles: https://www.babylonjs-playground.com/#5A4TP5
-
你还可以找到一个扩展广告牌粒子的示例
Adjustable Playground Examples
可调节的Playground例子
调节最小最大发射盒
调节发射生存时间、频率、力度以及更新速度
Shape Emitters
具有形状的发射器
Starting from Babylonjs 3.2 you can shape the
region the particles are emitted from as a
从Babylon.js3.2版开始,你可以将粒子的发射区设定为以下形状
- Point 点
- Box 盒子
- Sphere 球体
- Hemisphere
半球体
- Cylinder 圆柱
- Cone 圆锥
by the addition of specific emitter function.
通过使用这些发射器特有的扩展方法。
Point Emitter
点发射器
To create a point emitter, you can run this code:
要建立一个点发射器,你可以运行以下代码:
var pointEmitter = particleSystem.createPointEmitter(new BABYLON.Vector3(-7, 8, 3), new BABYLON.Vector3(7, 8, -3));
The createPointEmitter method takes four
parameters in the following order
createPointEmitter方法按以下顺序使用四(2?)个参数
方向1:三元向量
The returned pointEmitter object can be
used to change the values of these properties.
操作返回的点发射器对象,可以再修改这两个属性
pointEmitter.direction1 = new BABYLON.Vector3(-5, 2, 1);
pointEmitter.direction2 = new BABYLON.Vector3(5, 2, 1);
点发射器的例子
Box Emitter
盒子发射器
To create a box emitter you use, for example
举个例子,你可以 用这样的方法建立一个盒子发射器:
var boxEmitter = particleSystem.createBoxEmitter(new BABYLON.Vector3(-7, 8, 3), new BABYLON.Vector3(7, 8, -3), new BABYLON.Vector3(-1, 0, 0), new BABYLON.Vector3(1, 0, 0));
The createBoxEmitter method takes four
parameters in the following order
createBoxEmitter方法按以下顺序使用四个参数
- direction1:
Vector3,
- direction2:
Vector3,
- minEmitBox: Vector3, 最小发射盒
- maxEmitBox: Vector3 最大发射盒
The returned boxEmitter object can be
used to change the values of these properties.
返回的盒子发射器对象,可以再修改这些属性
boxEmitter.direction1 = new BABYLON.Vector3(-5, 2, 1);
boxEmitter.direction2 = new BABYLON.Vector3(5, 2, 1);
boxEmitter.minEmitBox = new BABYLON.Vector3(-2, -3, -4);
boxEmitter.maxEmitBox = new BABYLON.Vector3(2, 3, 4);
Sphere Emitter
You can create a sphere emitter with a given radius, 1.2 for example, using
你可以使用一个半径参数来建立球体发射器,比如1.2:
var sphereEmitter = particleSystem.createSphereEmitter(1.2);
The returned sphereEmitter object can be
used to change the value of the radius.
The particles are emitted in the direction of the surface normals, ie the lines from the
center of the sphere through a surface point.
例子沿着发射器的表面法线的方向发射,也就是沿着从球体中心到球体表面一个点的连线发射。
球体发射器的例子
With sphereEmitter.radiusRange you can define
where along the radius the particles should be emitted. A value of 0 means only
on the surface while a value of 1 means all along the radius.
通过球体发射器的半径范围属性,你可以定义粒子可以在沿着半径距球体表面多远的地方发射。把这个值设为0意味着只能在球体表面发射,而设为1则意味着整条半径上都可以发射(看来都只能在球体内部发射)
If you prefer to chose
the emission direction, you can create a directed sphere emitter
如果你想要选择发射方向,你可以建立一个具有方向的球体发射器
var sphereEmitter = particleSystem.createDirectedSphereEmitter(1.2, new BABYLON.Vector3(1, 1, 1), new BABYLON.Vector3(2, 8, 2));
The createDirectedSphereEmitter method takes three
parameters in the following order
createDirectedSphereEmitter方法的参数如下:
- radius:
Number,
- direction1:
Vector3,
- direction2:
Vector3,
The returned sphereEmitter object can be
used to change the values of these properties.
返回的sphereEmitter对象可以修改这些属性。
sphereEmitter.radius = 3.4;
sphereEmitter.direction1 = new BABYLON.Vector3(-5, 2, 1);
sphereEmitter.direction2 = new BABYLON.Vector3(5, 2, -1);
The first parameter is the radius the second is direction1 and third is direction2.
(The direction will be generated randomly between direction1 and direction2)
第一个参数是半径,第二个是方向1,第三个是方向2(粒子发射方向将综合的在方向1和方向2之间随机取值)
带有方向的球体发射器的例子
Hemispheric Emitter
半球形发射器
You can create a hemispheric emitter with a given radius, 1.2 for example,
using
你可以使用一个半径来建立半球形发射器,比如1.2:
var hemisphericEmitter = particleSystem.createHemisphericEmitter(1.2);
The returned hemisphericEmitter object can be
used to change the value of the radius.
返回的hemisphericEmitter对象可以修改半径属性
The particles are emitted in the direction of the surface normals, ie the lines from the
center of the hemisphere through a surface point.
粒子沿着发射器的表面法线的方向发射,也就是沿着从球体中心到球体表面一个点的线发射。
半球形发射器的例子
With hemisphericEmitter.radiusRange you can define
where along the radius the particles should be emitted. A value of 0 means only
on the surface while a value of 1 means all along the radius.
通过半球形发射器的半径范围属性,你可以定义粒子可以在沿着半径距半径多远的地方发射。把这个值设为0意味着只能在球体表面发射,而设为1则意味着整条半径上都可以发射
Cylinder Emitter
圆柱体发射器
You can create a cylinder emitter with a given radius, height, radiusRange, directionRandomizer
with the following:
你可以使用给定的半径、高度、半径范围、随机方向建立一个圆柱体发射器:
var cylinderEmitter = particleSystem.createCylinderEmitter(1,1,0,0);
The returned cylinderEmitter object can be
used to change the value of the radius, height, etc.
可以用返回的cylinderEmitter对象可以修改半径、高度等属性。
The particles are emitted in the direction of the surface normals, ie outward from the
cylinder
粒子沿着发射器的表面法线的方向发射,也就是向圆柱体的外部发射。
圆柱体发射器的例子
With cylinderEmitter.radiusRange you can define
where along the radius the particles should be emitted. A value of 0 means only
on the surface while a value of 1 means all along the radius. With cylinderEmitter.directionRandomizer can change
how much to randomize the particles direction.
使用cylinderEmitter.radiusRange属性,你可以定义半径上的哪些部分可以发射粒子。0值意味着只有圆柱体的表面可以发射,1意味着整条半径都可以发射。使用cylinderEmitter.directionRandomizer属性可以修改粒子方向的随机性程度。
The createDirectedCylinderEmitter method takes three
parameters in the following order
createDirectedCylinderEmitter方法按照以下顺序使用5个参数:
- radius:
Number,半径
- height:
Number,高度
- radiusRange: Number,半径范围
- direction1:
Vector3, 方向1
- direction2:
Vector3, 方向2
The returned cylinderEmitter object can be
used to change the values of these properties.
可以使用返回的cylinderEmitter对象修改这些属性。
cylinderEmitter.radius = 3.4;
cylinderEmitter.direction1 = new BABYLON.Vector3(-5, 2, 1);
cylinderEmitter.direction2 = new BABYLON.Vector3(5, 2, -1);
The first parameter is the radius the second is direction1 and third is direction2.
(The direction will be generated randomly between direction1 and direction2)
第一个参数是半径,第二个是方向1,第三个是方向2(粒子发射方向将综合的在方向1和方向2之间随机取值)
带有方向的圆柱体发射器例子
Cone Emitter
圆锥发射器
To create a cone emitter you use, for example
举个例子,你可以使用如下方法建立一个圆锥发射器:
var coneEmitter = particleSystem.createConeEmitter(2, Math.PI / 3);
The createConeEmitter method takes two
parameters in the following order
createConeEmitter方法按以下顺序使用两个参数
- radius:
Number;半径
- angle: Number, measured in radians, the vertex
angle of the cone. 角度,以弧度度量,指圆锥的顶角角度
The cone is created with its axis along the Y-axis and its vertex at the
bottom.
圆锥建立时,圆锥轴沿着Y轴,顶角在底部。
With coneEmitter.radiusRange you can define
where along the radius the particles should be emitted. A value of 0 means only
on the surface while a value of 1 means all along the radius.
使用coneEmitter.radiusRange属性,你可以定义半径上的哪些部分可以发射粒子。0值意味着只有圆柱体的表面可以发射,1意味着整条半径都可以发射。
The same applies to coneEmitter.heightRange: you can define
where along the height the particles should be emitted. A value of 0 means only
on the top surface while a value of 1 means all along the height.
coneEmitter.heightRange的用法是一样的:你可以定义高度上的哪些部分可以发射粒子,0值意味着只有顶部的表面可以发射粒子,1意味着整个高度都可以发射粒子(也就是说这两个范围参数都设为0,则发射器变成圆环?)
Here is an example of a particle system emitted only from the outside of
a flat cone: https://www.babylonjs-playground.com/#B9HKG0#1
-
这里是一个只从圆锥表面发射粒子的例子
The returned coneEmitter object can be
used to change the values of these properties.
可以使用返回的coneEmitter对象修改这些属性:
coneEmitter.radius = 3.4;
coneEmitter.angle = Math.PI / 2;//可见所谓顶角是指整个夹角
With coneEmitter.emitFromSpawnPointOnly = true you can force the emitter to only emit particles
from the spawn point (the start of the cone).
将coneEmitter.emitFromSpawnPointOnly属性设为true,你可以强制发射器只从生成点(圆锥的起点)发射粒子
圆锥发射器
圆锥发射器的旋转
Noise texture
噪声纹理
Starting with Babylon.js v3.3, you can now use noise texture to "perturbate" the position of particles. The noise
texture is technically used to apply change to the direction of the particles:
从Babylon.js3.3开始,你可以使用噪声纹理来扰动粒子的位置。噪声纹理是一项用来改变粒子方向的技术:
var noiseTexture = new BABYLON.NoiseProceduralTexture("perlin", 256, scene);
noiseTexture.animationSpeedFactor = 5;
noiseTexture.persistence = 2;
noiseTexture.brightness = 0.5;
noiseTexture.octaves = 2;
particleSystem.noiseTexture = noiseTexture;
particleSystem.noiseStrength = new BABYLON.Vector3(100, 100, 100);
Alongside setting the noiseTexture you can
also control the strength applied on each axis with particleSystem.noiseStrength.
在噪声纹理技术中,你还可以用particleSystem.noiseStrength.属性控制每个坐标轴上的强度。
Demo can be found here: https://www.babylonjs-playground.com/#R1JWLA#3
-
示例可以在这里找到:
GPU Particles
GPU粒子
Starting from Babylon.js v3.2, you can leverage a new WebGL2 feature, the
transform feedback buffer, to drastically boost the performance of particles.
Whereas regular particles use the CPU for animation and the GPU for rendering
the new WebGL2 API allows Babylon.js to use the GPU for both animation and
rendering. With GPU particles, everything is offloaded to the GPU.
从Babylon.js3.2版开始,你可以使用一个新的WebGL2特性——变换反馈缓存,来强烈的提升粒子的表现。相对于普通的粒子使用CPU处理动画、使用GPU处理渲染,新的WebGL2 API允许Babylon.js使用GPU处理动画和渲染。使用GPU粒子技术,所有的东西都将推给GPU处理。
Unfortunately this feature is only available when WebGL2 is available. You
can use BABYLON.GPUParticleSystem.IsSupported to detect if
GPU particles can be used. When they are supported, GPU particles can almost be
used like regular particles:
不幸的是,这一特性只在使用WebGL2的情况下可用。你可以使用BABYLON.GPUParticleSystem.IsSupported属性来判断你的电脑配置是否可以使用GPU粒子。当可用时,GPU粒子几乎可以像普通粒子一样使用:
var particleSystem = new BABYLON.GPUParticleSystem("particles", { capacity:1000000 }, scene);
As CPU is no longer involved, you can go crazy with active particles (1000000
in this example). Also, you can use particleSystem.activeParticleCount to define the
number of active particle count if you want to limit the GPU usage.
因为不再涉及CPU,你可以疯狂的使用粒子(例子里使用了1000000个粒子)。同时,你可以使用particleSystem.activeParticleCount属性来定义激活粒子的数量,如果你想限制GPU使用的话。
Note: Sub emitters are not
supported in GPU particles.
注意:补充的发射器并不被GPU粒子技术支持。
(变换反馈缓存:传统的OpenGL技术通常只负责将着色器生成的像素颜色发送给显示设备,而新的变换反馈缓存技术则可将着色器程序的计算结果发送回计算机内存,这样CPU就可以再次对GPU的计算结果进行处理,基于显卡的机器学习和比特币挖矿等技术均由此发展而来)
Random Texture
随机纹理
It is a shame but there is no good way to get random numbers when running
on the GPU. To fill this gap, Babylon.js will create a texture filled with
thousands of random values. These values will be read by the particle update shader to animate the particles. By default the biggest
supported texture size is used (16K). You may want to reduce the size of this
texture by initializing the system like this:
这真的是一个耻辱,但确实没有很好的办法在GPU里获取随机数。为了填这个坑,Babylon.js将建立一个充满了数千个随机值的纹理。这些值将作为“粒子更新着色器”在处理粒子动画时的备用随机数。默认情况下使用可用的最大纹理尺寸(16K,应该指正方形纹理的边长)。你可能希望降低这个纹理的尺寸,你可以在初始化GPU粒子系统时这样做:
var particleSystem = new BABYLON.GPUParticleSystem("particles", { capacity:1000000, randomTextureSize: 4096 }, scene);
Fallback
回退
As the GPUParticleSystem and the ParticleSystem share almost all their API, it is easy to
switch from one to another when WebGL2 is not supported. Keep in mind that the
CPU cannot animate as many particles as the GPU can. So you will probably have
to reduce the capacity of your system when not using the GPUParticleSystem.
因为GPU粒子系统和粒子系统使用几乎相同的API,在WebGL2不被支持时从一种切换为另一种是很简单的。请记住,CPU不能像GPU一样处理那么多的粒子。所以在不使用GPU粒子系统时,你可能必须降低粒子系统的容量。
Stopping a GPU Particle System
停止一个GPU粒子系统
When calling system.stop() on a GPUParticleSystem object, you
will force the system to stop generating new particles. But particles will
still be rendered even if not visible.
当在一个GPU粒子系统对象上调用system.stop()时,你将强制系统停止建立新的粒子。但是即使不可见,粒子仍将被GPU渲染。
To completely stop a GPUParticleSystem, you have to call
dispose() on it.
要完全停止一个GPU粒子系统,你必须对他调用dispose()方法。
Unsupported Features
不支持的特性
The following features are not supported by GPU particles due to their inner
nature:
因为它们的内在本质,下面的这些特性是不被GPU粒子支持的:
- ManualEmitCount 现有发射计数
- Custom
effects 自定义效果
- Animation
sheets 动画分片
- disposeOnStop 停止时自动释放
- Dual
values per gradient (only one value is supported) 每个梯度的二元值(只支持一个确定值)
- Emit rate
gradients are not supported 发射频率梯度不支持
- Start
size gradients are not supported 起始尺寸梯度不支持
Playground
GPU粒子例子
Next step
下一步
ParticleSystems are very powerful and
versatile tools that can help bring realness and movement to your scenes.
Don’t hesitate to use them as they are not resource-intensive.
粒子系统是一种非常强大并且用途广泛的工具,你可以用它为你的场景带来真实感和动感。不要犹豫是否使用它们,因为它们对资源的消耗并不大。
Stay with us, because we are going to learn a new, very interesting thing:
Configuring your
environment.
和我们待在一起,因为我们将学习下一个非常有趣的新东西:设置环境。
Further Reading
扩展阅读
Basic - L1 基础-等级1
Particles Overview
粒子概述
Particle Helper 粒子辅助
Mesh Overview 网格概述
How to Create Animated
Particles 如何建立具有动画效果的粒子
How to Use Sub Emitters
如何使用附加发射器
Solid Particle
System 实体粒子系统
Intermediate - L2 中等-等级2
How to Customize the
Particle System 如何自定义粒子系统
How to Create
animated particles如何建立具有动画效果的粒子